
Petrographic Thin Section Preparation: Rock Thin Section Analysis
In the fields of Optical Mineralogy and Petrography, a Thin Section is a meticulously prepared laboratory sample of a rock, mineral, soil, pottery, bones, or even metal, designed for examination under a Polarizing Petrographic Microscope, Electron Microscope, or Electron Microprobe. The process involves precision cutting of a sample with a diamond saw to obtain a thin sliver, which is then polished to an optical flatness. The sample is then mounted on a glass slide and polished to a thickness of 30 micrometers using progressively finer abrasive grits. The method utilized involves the application of the Michel-Lévy Interference Color Chart, with quartz serving as the standard for determining thickness, due to its abundant presence.
When viewed between two polarizing filters oriented at right angles to one another, the minerals in the Thin Section alter the color and intensity of the light, thus exhibiting their optical properties. These variations in optical properties enable the easy identification of most rock-forming minerals, such as Plagioclase, which appears as a clear mineral with multiple parallel twinning planes, or Clinopyroxene, which appears as a large blue-green mineral with exsolution of Orthopyroxene.
Thin Sections are prepared to study the optical properties of minerals in a rock and are integral to the field of Petrology, providing valuable insights into the origin and evolution of the parent rock.
Preparation of Rock Thin Sections for Limestone Samples
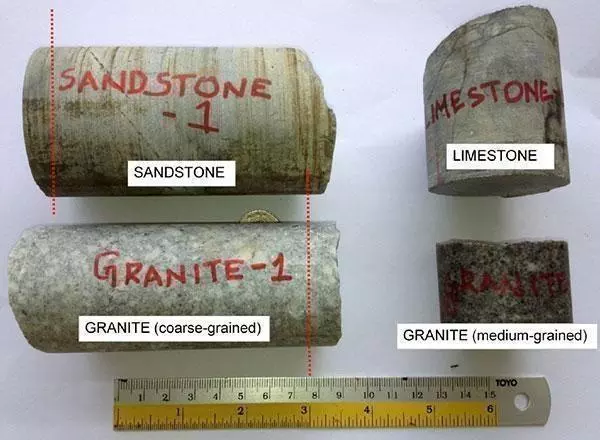
Limestone is a sedimentary rock comprised mainly of the minerals Calcite and Aragonite, which are distinct crystal structures of Calcium Carbonate (CaCO3). This rock type primarily consists of skeletal fragments from marine organisms such as coral and foraminifera, and constitutes approximately 10% of the total volume of all sedimentary rocks. Limestone's solubility in water and weak acids leads to the formation of karst landscapes, characterized by water erosion over extended periods of time, ranging from thousands to millions of years. This geological process results in the formation of most cave systems, which are formed in limestone bedrock. Limestone has numerous practical applications, including its use as a building material, as an aggregate in road construction, as a white pigment or filler in products such as toothpaste and paint, and as a chemical feedstock.
| Cutting & Grinding Stages for Limestone | |
|---|---|
| Equipment Used: | Thin Section Machine - KemTech Geo |
| Cutting Disc | Ø200 Diamond Cut-off wheels (Metal Bonded, high conc.) |
| Grinding Wheel | Ø 175 Dıamond cup grinding wheel, 35 mic |
| Standard Slides 27 x 46 x 1.27, 144 pcs. | |
| Polishing Stage for Limestone | |
| Equipment Used: | KemTech III Thin Section Lapping Machine |
| Sample Holder | Vacuum jig (Specimen Fixture) |
| Plate/Pad | Cast Iron Lapping Plate, PSU-M & MBL-M Polishing Pad |
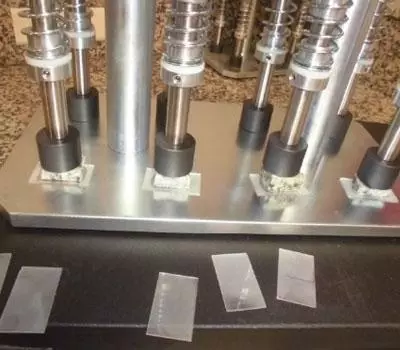
- Obtain an 8-10 mm piece of the main stone sample using the KemTech Geo's left side cutting station.
- Roughen the surface of the glass slide to aid in securing the sample by grinding with the Lapping plate on the KemTech III using Silicone Carbide and water.
- Attach the stone sample to the glass slide using KEPT epoxy resins, and place in the Geofix to ensure proper bonding under pressure.
- Place the glass slide on the Vacuum chuck at the KemTech Geos' left side station and use the special slide cutting mechanism to reduce the sample thickness to approximately 2.0 mm.
- Move the sample to the right station of the KemTech Geo and use the vacuum to precisely grind the sample. Adjust the digital positioning of the micrometer to zero and begin grinding with a grinding cup, reducing the sample's thickness from 2.0 mm to 80 microns, with increments of 50 microns when the sample thickness reaches 200 microns.
- Set the KemTech vacuum jig to the desired final thickness and mount the uniformly ground sample on the vacuum jig face.
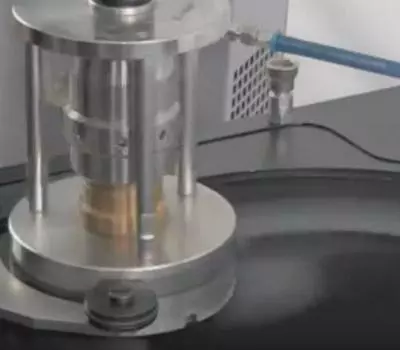
- Lap the sample on the KemTech III machine using a Silicone Carbide and water mixture until the diamond faced stop ring of the jig contacts the cast iron lapping plate. This point is indicated by a change in sound.
- Remove the slide and clean and inspect. The slides are now ready for polishing on the KemTech III.
- Clean the Vacuum jig in an ultrasonic cleaner to remove any lapping slurry contamination, and adjust the diamond stop ring to be above the vacuum face plate.
- Replace the cast iron lapping plate with an aluminum lift-off disc and mount a PSU-M polishing pad.
- Charge the Aku-Disp slurry pump with Diamond suspension and program the pump to dispense 2 seconds of slurry every 8-10 seconds.
- Mount the lapped sample on the clean vacuum jig and polish using PSU and MBL cloths, reducing the Diamond suspension micron size to the desired thickness and surface finish of approximately 30 microns. Remove the sample and clean. The slide is now ready for analysis.

Limestone
Limestone microstructure

Limestone: After cutting operation (10x)

Limestone: Ground by 6 μ diamond (10x)

Limestone: Polished by 3 μ diamond paste (10x)
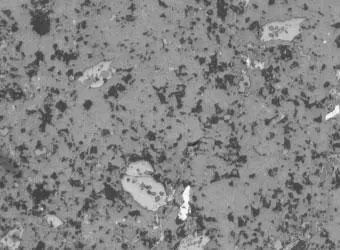
Limestone: Polished by 1 μ diamond paste (10x)

Rock Thin Section Preparation of MgO-Cr Brick
Precision Cutting / Sectioning Stage
Equipment: KemTech Geo
Cutting Fluid: Kemet Cutting Fluid
Cut off Wheel: Diamond Cutting Disc
The sample should be securely affixed to the KemTech Geo using universal specimen vises, with the feed rate set to 150 rotations per minute.

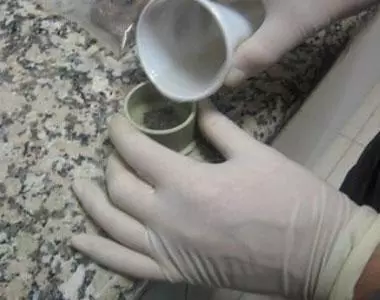
Cold Mounting Stage
Embedding form Dia.: 25-40 mm
Cold Mounting Resins: KEPT Epoxy
The cut specimens must be thoroughly dried, either through standard drying methods or by utilizing a hot plate set at 35°C. The epoxy resin should then be mixed in a 2:1 ratio and poured into a mold. The molded samples should be placed in the KemVac under a vacuum pressure of 650 mm/Hg for 10-12 minutes. During this time, air bubbles in the mounting mixture may become visible, but they typically dissipate within 45 minutes. The vacuum pressure should then be adjusted to a range of 100 mm/Hg to 130 mm/Hg using the vacuum gauge. The curing process takes approximately 8 hours to complete.
Cutting and Grinding Specimens with the KemTech Geo
When preparing to cut samples using the KemTech Geo, it is recommended to leave the samples approximately 10mm thick from a previous cutting step. Thinner samples may cause the cutting blade to come loose. The desired thickness for the samples should be 2-3mm, which can be achieved by visually judging with the KemTech Geo. To replace the cutting disc, simply remove the two pockets located in the front and position the machine plate upwards. Ensure that the water jet is aimed at the diamond edge of the disc for optimal results.
A circulation system can be useful, as the machine consumes a significant amount of water. No refrigerant or rust inhibitors are required as the KemTech Geo does not work with metal. The samples are secured through a vacuum system, with the counter set at -600 to -500. The vacuum clamp can accommodate glass slides of 1" x 2", 1" x 3", and 2" x 3" by adjusting the pockets to fit the size of the glass. The height should not exceed the desired thickness of the sample.
The vacuum pump is equipped with water containers on both sides, which should be kept below the maximum level to avoid pump damage. It is recommended to empty the containers before each use.
For efficient results, it is best to first flatten the glass sheets. This will ensure that the samples are flat and uniform in thickness. The vacuum jig on the KemTech III can be used for this purpose. To improve adhesion with the embedding agent, it is recommended to frost the slides or at least the sample side. The resin should be applied by lubricating one edge of the underside, tilting it, and moving linearly up and down to spread the resin under the sample. The desired layer thickness should be around 10 microns, taking into account the thickness when adjusting the micrometer.
The samples should be left to rest under pressure, and lapping the samples on the bonding edge may be necessary for desired thinness. After the samples are properly mounted, the vacuum holders of the KemTech Geo should be flattened, either through grinding or flat lapping.

For grinding, it is important to consider the following guidelines. For thicknesses up to 200 microns, increments of 50 microns per motion (back and forth) can be taken. Smaller increments may be necessary for harder rocks. Beyond that, increments of 20 microns should be used. Using 50 micron increments may cause burnishing, and with limited material left, it may not be possible to remove it during a post-lapping or polishing process.
When grinding, set the clock to "0" when the glass just touches the disc, then adjust back to the desired thickness and set it back to "0". If flat lapping will be performed afterwards, the setting can be set to 200 μm. Otherwise, the limit for grinding should be around 80 μm, taking into account the thickness of the resin (10 microns). The glass slides and stone samples can be lapped on a cast iron plate with SiCa 9.6 μm, or pre-frosted glasses can be purchased.
Glossary of Petrographic Terms
Refractory materials
Refractory materials are high-temperature resistant substances used in a variety of applications, such as furnace linings, kilns, reactors, and crucibles. These materials must be capable of maintaining their strength and stability under harsh conditions, such as high temperatures and thermal shock. The chemical and physical properties of refractory materials are defined by ASTM C71 as "non-metallic materials having those chemical and physical properties that make them applicable for structures, or as components of systems, that are exposed to environments above 1,000°F (811 K; 538°C)".
The most common materials used in the production of refractory materials are the oxides of aluminum (alumina), silicon (silica), and magnesium (magnesia), as well as fire clays and calcium oxide (lime). In specific applications, specialized refractory materials such as zirconia, silicon carbide, and carbon (graphite) may also be utilized. However, it is important to note that these materials are only suitable in a limited range of conditions and cannot be used in contact with oxygen, as they will oxidize and combust.
Refractory materials can be classified based on chemical composition, method of manufacture, physical form, or intended application. Acidic refractories are used in areas with an acidic slag and atmosphere and are resistant to acids but susceptible to alkalis. Neutral refractories, on the other hand, are suitable for environments that are either acidic or basic and are chemically stable in both conditions. These materials often belong to the R2O3 group and commonly include alumina (Al2O3), chromia (Cr2O3), and carbon.
Neutral refractories
Refractory materials that are neutral in nature are utilized in environments where the slags and atmosphere are either acidic or basic, and they exhibit chemical stability in the presence of both acidic and alkaline substances. The primary constituents of these materials typically belong to the R2O3 group, with examples such as alumina (Al2O3), chromia (Cr2O3), and carbon.
Microstructure of high density sintered magnesite, containing 97% MgO

Basic refractories
Basic refractories are materials that are used in areas where the slags and atmosphere are basic and stable with alkaline materials, but react with acids. The primary raw materials used in their production belong to the RO group, with magnesia (MgO) being one of the most commonly used examples. Other materials used include dolomite and chrome-magnesia. The method of manufacture can vary, including dry press process, fused cast, hand molded, formed (normal, fired, or chemically bonded), and un-formed (monolithic-plastic, ramming and gunning mass, castables).
The microstructure of grain of standard liquefied MgO

Types of Shaped Refractories
Refractories that have fixed shapes can be divided into two categories: standard shapes and special shapes. Standard shapes conform to the dimensions commonly used by most refractory manufacturers and are suitable for kilns or furnaces of the same types. In contrast, special shapes are tailored to meet the specific requirements of a particular kiln or furnace.
Unshaped Refractories
Refractories without definite form, known as monolithic refractories, take shape during the application process. Examples of these include plastic masses, ramming masses, castables, gunning masses, fettling mix, and mortars.
Refractory Anchorage
All refractories require anchoring systems, such as wire-formed anchors, formed metal, or ceramic tiles, to support the refractory linings. Anchorage for refractories on roofs and vertical walls is particularly crucial as it must be able to support the weight of the refractory even under elevated temperatures and operating conditions. Anchors with circular or rectangular cross-sections are commonly used. Circular cross-sections are appropriate for low-thickness refractories and can support less weight per unit area, while rectangular cross-sections are used for high-thickness refractories and can support a higher weight of refractory per unit area. The number of anchors required depends on the operating conditions and the refractory materials. The choice of anchor material, shape, number, and size significantly affects the longevity of the refractory.
Corrosion Test of cylindrical 30 MgO Spinel
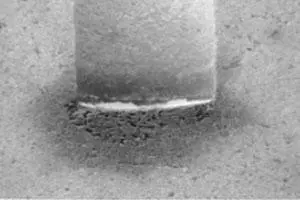
Spinel with 30 Si + 30 Zirkon

